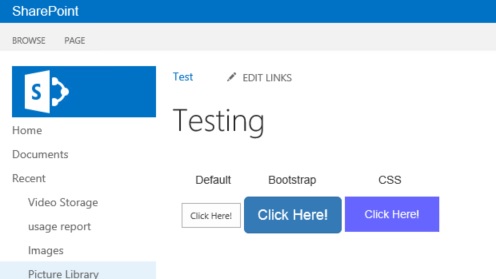
So there are a few ways of creating custom buttons in SharePoint however, I like my buttons to be noticeable so I tend not to use the standard button however, I’ve shown below how to create buttons using basicbutton, Bootstrap & CSS.
Changing the text for a button within SharePoint can be done through JQuery. Some of the requests I’ve had require this to say ‘Send’, ‘Submit’, ‘Cancel Request’ & ‘Back’.
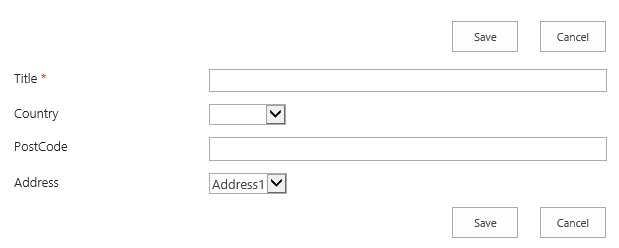
To begin with, open the form you want this change made, for me, I’d like this on the NewForm. The below form is a copy of the new form that I’ve created in SharePoint Designer.
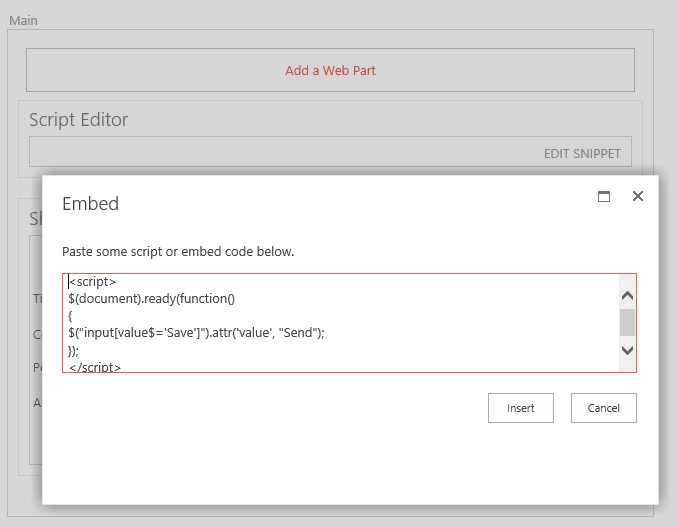
Edit the NewForm page and add a Script Editor Web Part. Copy the code below and paste in the script editor Web Part. If you’d like the save value to be something other than save, make sure you change the part where I’ve written ‘Send’.
Over the past few months I’ve been asked whether it’s possible to hide columns based on the value of another column and whether it’s a fast and easy change, the answer is basically yes.
If you have a custom Display or Edit Form, you can manipulate the columns slightly to hide an irrelevant column. Take a look at the screenshots below of my SharePoint list and SharePoint Designer Form.
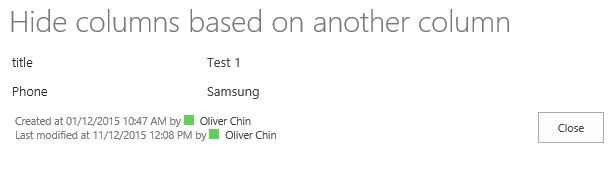
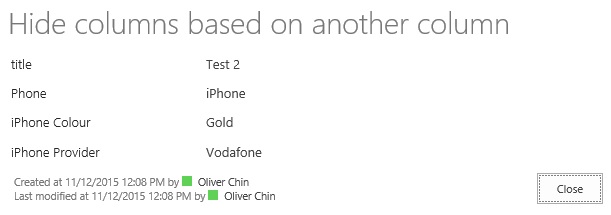
To begin with I have a list with just 4 columns. As you will notice two of the columns only relate to iPhone and therefore are useless if the phone is a Samsung.
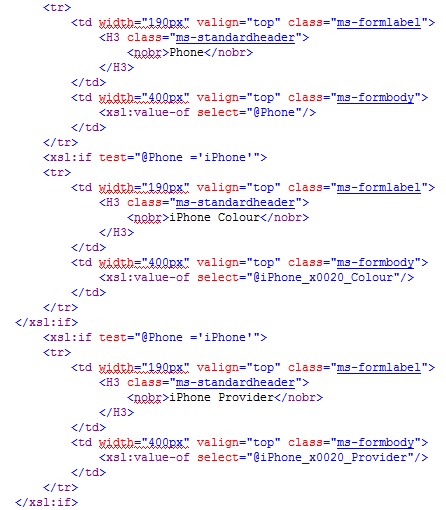
The way to hide the columns is through SharePoint Designer, edit the form in advanced mode and scroll down to your columns. The only modification that is required is to add <xsl:if test=”<COLUMN-NAME> = ‘COLUMN-RESULT'”> before the <tr> as well as after the </tr> as shown below. (code isn’t lined up, sorry about that!)
The end results when I click on each item from my list are below.
Unfortunately this isn’t possible on the New Form as this would require it to be dynamic to which mine isn’t.
An alternative way of doing this is to use to code here: https://github.com/kitmenke/sputility, copy the jquery & sputility to a SharePoint Library and reference as below. This is ideal as the form is dynamic and to me, easier to work with. Credit goes to kitmenke!
***edit the form from within SharePoint (edit page) & insert a script editor webpart to paste the below in***
Another request I’ve had is to hide columns on the new item form which in my case required the use of SharePoint Designer again. Details below.
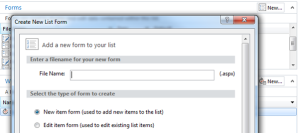
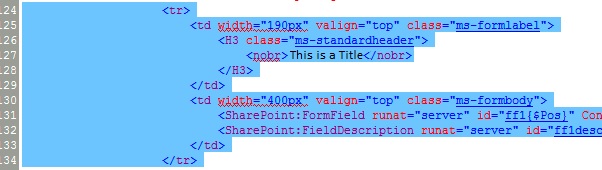
Within SharePoint Designer navigate to your list, create a new item form and edit in advanced mode (right click to edit in advanced mode).
Search for your column name and highlight the code within the <tr></tr>, this can then be re-arranged in order or deleted as per the below, save the form and preview in browser.
A recent request I had was to prevent users from editing a column once the item had been created. This had to be done in SharePoint Designer, sure you can get around this with the quick edit option in SharePoint however, in my list quick edit was turned off to prevent this.
Open SharePoint Designer and navigate to the list, create a new edit form and edit in advanced mode.
Look for your column name and find the control mode within the SharePoint:FormField line. You will notice the ControlMode is usually set to ControlMode=”Edit”, change this to ControlMode=”Display”, save the form and check SharePoint for the results.<td width=”400px” valign=”top” class=”ms-formbody”> <SharePoint:FormField runat=”server” id=”ff6{$Pos}” ControlMode=”Display” FieldName=”DueDate” __designer:bind=”{ddwrt:DataBind(‘u’,concat(‘ff6′,$Pos),’Value’,’ValueChanged’,’ID’,ddwrt:EscapeDelims(string(@ID)),’@DueDate’)}”/>
<SharePoint:FieldDescription runat=”server” id=”ff6description{$Pos}” FieldName=”DueDate” ControlMode=”Edit”/>
</td>
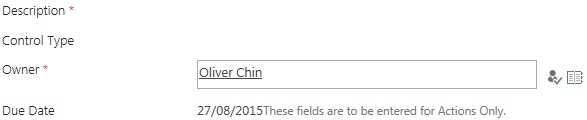
The end result is shown below, this is the edit form in SharePoint.