Tag Archives: CSS

Set Focus on Content on a SharePoint page

Within SharePoint there is a small button in the top right which focuses on the content. Basically it hides the top navigation and quick launch.

For my own purposes I required this to be the default as I was creating a display page. The following code below helped achieve this, it’s also worth noting that the Focus button can still be pressed if the user would like to view the navigation/quick launch.

The code below is not my own, this was through Technet forum replies.

<script type=”text/javascript”>
function pageLoad()
{
$(document).ready(function(){
$(“body”).addClass(“ms-fullscreenmode”);
$(“#fullscreenmode”).css(“display”, “none”);
$(“#exitfullscreenmode”).css(“display”, “”);
});
}
</script>

Another way…

<script>
_spBodyOnLoadFunctionNames.push(“HideBrandingsuite”);
function HideBrandingsuite()
{
SetFullScreenMode(true);
}

</script>


Cascading Dropdowns – how it’s done

If you’ve Googled Cascading Dropdowns you will realise there are various ways of doing this. Due to my background not being a developer of any sort the easiest solution to me was some short code. I’ve explained below the steps for creating this.

  1. Create 3 lists (or more depending on how many cascading levels you require), you don’t need to rename the title column, we can use as is.
  2. Create your master list that has all these drop downs in.
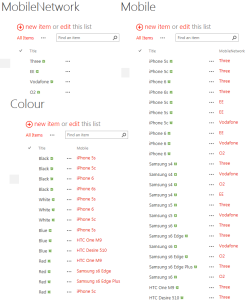
  3. Using the three lists, populate your data, I’ve used mobile networks and their offerings.
    Mobile
  4. Within each list, use a lookup to the previous list and insert the data as required, review the screenshot above for example.
  5. Using your master list, add look-ups to all three different columns and order as required.
  6. Open SharePoint Designer and navigate to your list, create a new ‘NewItem’ form & a new ‘EditForm’.
  7. Edit the forms in advanced mode and search for ‘PlaceHolderAdditionalPageHead’.
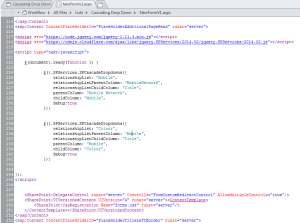
  8. In this section is where you will paste the following code.
    ___________________________________________________________________________________________________
    <script src=”https://code.jquery.com/jquery-1.11.3.min.js”></script>
    <script src=”https://cdnjs.cloudflare.com/ajax/libs/jquery.SPServices/2014.02/jquery.SPServices-2014.02.js”></script><script type=”text/javascript”>

    $(document).ready(function () {

    $().SPServices.SPCascadeDropdowns({
    relationshipList: “Mobile”,
    relationshipListParentColumn: “MobileNetwork”,
    relationshipListChildColumn: “Title”,
    parentColumn: “Mobile Network”,
    childColumn: “Mobile”,
    debug:true
    });

    $().SPServices.SPCascadeDropdowns({
    relationshipList: “Colour”,
    relationshipListParentColumn: “Mobile”,
    relationshipListChildColumn: “Title”,
    parentColumn: “Mobile”,
    childColumn: “Colour”,
    debug:true
    });

    });
    </script>

    ___________________________________________________________________________________________________

    newformcode

  9. Modify the code slightly to reference your own lists & columns within the lists, save and close. If this was done on the New Item form, do the exact same for the edit form.
  10. Open the list in SharePoint and viola!
    cascadingnewformsp

There are a few different ways of doing this that doesn’t require modification of the forms however, for my own benefits I chose the forms to add this code to.