Nearly every client I’ve come across has Search configured, although not every client has it running efficiently, many have errors or issues that aren’t always resolvable and result in rebuilding the Search service.
The information below will show how to recreate the Search service with minimal downtime.
The server setup of this farm is as the follows:
1 Domain Controller
1 SQL Server
2 APP Servers
2 WFE Servers
This post can be used for bigger farms or even smaller farms however, adjust the PowerShell code to include the additional servers to balance the Search components. Microsoft provide a great TechNet article specifically for planning an enterprise Search service which can be found here: https://technet.microsoft.com/en-gb/library/dn342836.aspx
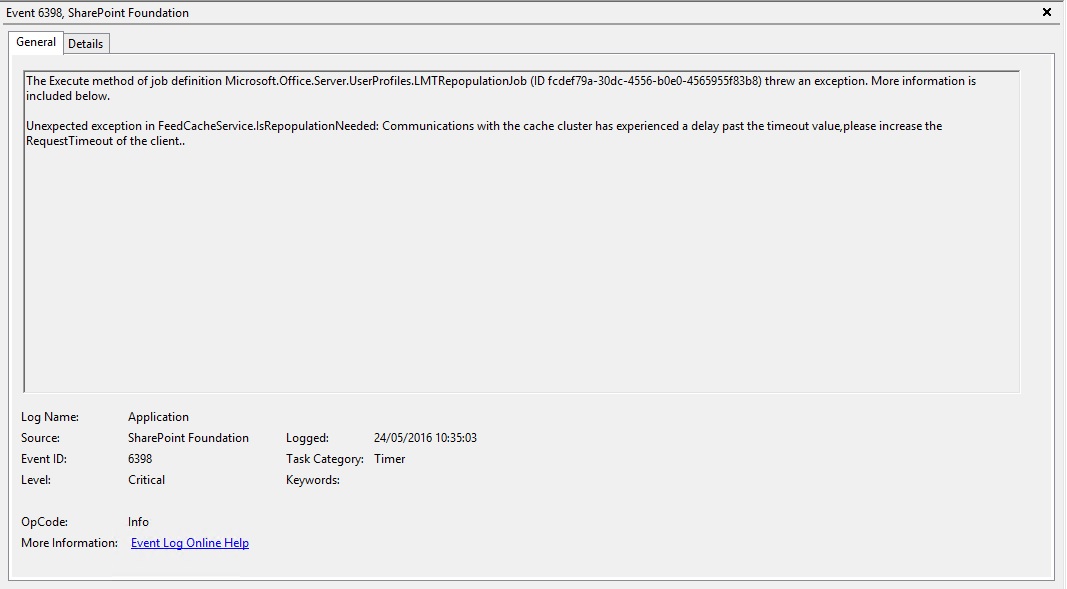
In this scenario we have a Search service application which does not do full crawls and just hangs unless the services on the server are restarted to which it works correctly, doing this daily is not efficient, neither should the Search Service work in this manner.
To begin with, if you have an existing Search service application, remove all the crawl schedules for all content sources.
Download the following PowerShell scripts:
export-import-mp.ps1
https://gallery.technet.microsoft.com/office/Powershell-script-to-09ffa974
export-import-cp.ps1
https://blog.lekman.com/2015/08/script-to-import-export-compare-and.html
The original script was created by Riccardo Celesti which exports/imports Search managed properties, the second script was modified by Tobias Lekman to export/import Search crawled properties. If you do not need the managed or crawled properties copied across, this stage can be skipped
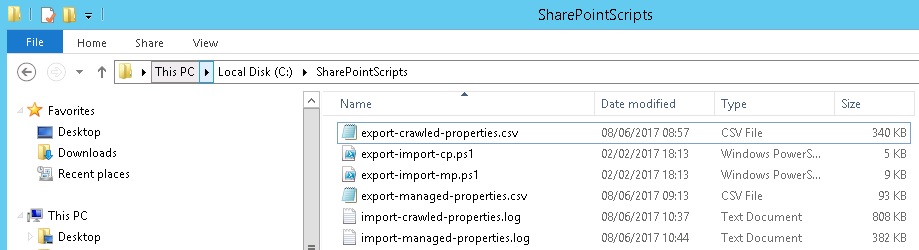
Once you’ve downloaded both scripts, place them on the server in a scripts folder. While on the server, open Windows PowerShell ISE in administrator mode. You’ll need to change the directory to your scripts folder, this can be done by running “cd c:\<SharePointScriptsFolderLocation>.
![]()
Once your directory is looking at the scripts folder, type the following to export:
#Make sure the service app name is the old search service name as shown in SharePoint service applications section.
.\export-import.cp.ps1 -serviceapp “Old Search Service” -export
![]()
Once completed run the other PowerShell script to export the Managed Properties:
#Make sure the service app name is the old search service name as shown in SharePoint service applications section.
.\export-import-mp.ps1 -serviceapp “Old Search Service” -export
![]()
When both have been exported, check the scripts folder, you’ll notice two CSV files which are export-crawled-properties.csv and export-managed-properties.csv. If however you do not see these but the script ran successfully, it could potentially be because you never changed the directory and therefore, you’ll need to check the system32 folder for the CSV files. Within the SharePointScripts folder, you’ll also have a log file of what happened.
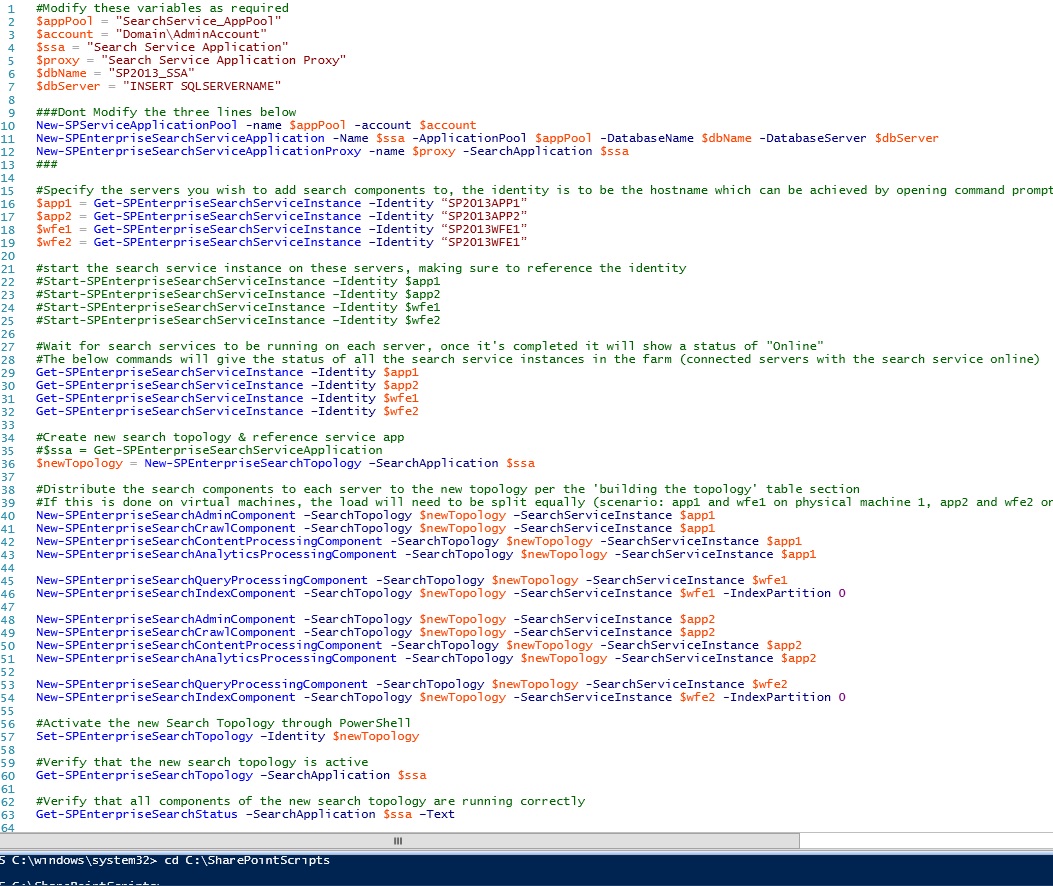
Now the managed and crawled properties have been exported, copy the PowerShell script below and paste this into PowerShell ISE (admin mode), this code will create a new Application Pool, a new Search service application, a new Search service application proxy and will also distribute the components equally to the required servers in the farm. To confirm which component you want on each virtual machine, you can check Microsoft documentation for best practices. It is worth checking the variables so they aren’t currently being used. Ensure you change the identity to the name of your servers.
The commented out sections define exactly what is happening as you run the script. You can run all the script together or in stages.
| #Modify these variables as required $appPool = “SearchService_AppPool” $account = “domain\AdminAccount” $ssa = “Search Service Application” $proxy = “Search Service Application Proxy” $dbName = “SP2013_SSA” $dbServer = “SQLSERVERNAME”#Don’t Modify the three lines below New-SPServiceApplicationPool -name $appPool -account $account New-SPEnterpriseSearchServiceApplication -Name $ssa -ApplicationPool $appPool -DatabaseName $dbName -DatabaseServer $dbServer New-SPEnterpriseSearchServiceApplicationProxy -name $proxy -SearchApplication $ssa#Specify the servers you wish to add search components to, the identity is to be the hostname which can be achieved by opening command prompt as administrator and typing ‘hostname’ $app1 = Get-SPEnterpriseSearchServiceInstance –Identity “SP2013APP1” #start the search service instance on these servers, making sure to reference the identity, if they’re already on, you won’t need to run the 4 lines below, these are commented out to begin with, remove the ‘#’ for the script to run this #Start-SPEnterpriseSearchServiceInstance –Identity $app1 #Wait for search services to be running on each server, once it’s completed it will show a status of “Online” Get-SPEnterpriseSearchServiceInstance –Identity $app1 $ssa = Get-SPEnterpriseSearchServiceApplication #Distribute the search components to each server in the topology. New-SPEnterpriseSearchAdminComponent –SearchTopology $newTopology –SearchServiceInstance $app1 New-SPEnterpriseSearchQueryProcessingComponent -SearchTopology $newTopology -SearchServiceInstance $wfe1 New-SPEnterpriseSearchAdminComponent -SearchTopology $newTopology -SearchServiceInstance $app2 New-SPEnterpriseSearchQueryProcessingComponent -SearchTopology $newTopology -SearchServiceInstance $wfe2 #Activate the new Search Topology through PowerShell #Verify that the new search topology is active #Verify that all components of the new search topology are running correctly |
Once the script has completed, you’ll then need to import the crawled properties and managed properties. Run the crawled properties first, to do this, open a new window in PowerShell ISE (admin) and type:
.\export-import-cp -serviceapp “Search Service Application” -import
#Making sure that serviceapp is the name of your new search service.
![]()
Once completed, run the managed properties script as per below:
.\export-import-mp -serviceapp “Search Service Application” -import
#Making sure that serviceapp is the name of your new search service.
![]()
We run the crawled properties first as the managed properties are mapped to crawled properties, so if you attempted to run the managed properties script first, it wouldn’t find any of the custom crawled properties as there wouldn’t be any extras.
When the managed properties have run correctly, it’ll show as below.

Do a comparison of the managed properties and crawled properties between the old search service application and the new one to confirm it’s the same amount.
Go into SharePoint Central administration to the ‘Manage Service Applications’ page. Click the space next to your new Search service so it’s selected and click permissions in the top ribbon, copy the accounts that are in your old search service to the new one here. Alternatively, you’ll need the account that’s administrating the search service, as well as the account that’s running the User Profile Service for people search, the accounts should have full control.
Now open the new Search Service Application & the old Search Service Application in separate tabs, go to the Crawl rules, copy any of the Crawl rules from the old search service to the new.
Ensure the content sources have also been copied across.
The last step before running a full crawl on your new Search Service is to restart the Search service
For a full crawl, if you have multiple content sources, it’s best to try first on the smallest content source, in most occasions this is the People Search content source, as this is against the number of users in the farm, if people aren’t using their my sites (which is the case normally) this shouldn’t take long at all as there will be less data to crawl.
Once you’ve crawled all the content in your new Search Service, ensure the schedules for the crawls have been setup correctly.
When you are completely happy with the new Search service where you can see there are items it has crawled, it’s time to make this live. Currently your old search service application is still live with all previously crawled content in the database. To change this to the new Search service, navigate to Central Administration –> Manage Web Applications –> highlight the SharePoint Web App and select ‘Service Connections’ in the ribbon. Select the proxy that relates to the newly created Search Service application.
This will swap over your old search service for the new search service.
It is worth noting, doing it this way will place heavy stress on your SQL Server, both CPU & Storage. Therefore ensure your SQL Server can cope this the strain. (as well as the app servers).
Information around SharePoint Search
Search Databases
The Search service application has four databases which each have separate roles in supporting SharePoint. When the search service application is created, the four databases are created which are the search administration, analytics reporting, crawl store & link database.
Search Administration
The Search administration database hosts the Search service application configuration and handles crawl state orchestration, including the content source crawl history.
Analytics Reporting
The Analytics Reporting database stores the results for usage analysis reports and extracts information from the Link database when needed.
Crawl Store
The Crawl Store database stores the state of each crawled item and provides the crawl queue for items currently being crawled.
Link
The Link database stores the information that is extracted by the content processing component and the click through information.
New Search Service Application
For a new Search Service application, ideally a new application pool should be created too. The code below will create a new application pool, search service & search proxy.
#Modify these variables as required
$appPool = “SearchService_AppPool1”
$account = “domain\service_sp_search”
$ssa = “Search Service”
$proxy = “Search Service Proxy”
$dbName = “SP2013_SSA”
$dbServer = “SharePointSQLSearch”
###Dont Modify the three lines below
New-SPServiceApplicationPool -name $appPool -account $account
New-SPEnterpriseSearchServiceApplication -Name $ssa -ApplicationPool $appPool -DatabaseName $dbName -DatabaseServer $dbServer
New-SPEnterpriseSearchServiceApplicationProxy -name $proxy -SearchApplication $ssa
###
As this application pool will be used against Search, a search account is used. When the Search service application has been built, it’s ideal to check the SQL Server to confirm these are installed at the location you require and that they’re all there with the naming convention you require. If the naming convention is wrong, start over again.
OLD/INACTIVE Topologies
Deleting an old or inactive topology can be achieved in PowerShell too.
run:
Get-SPEnterpriseSearchTopology
There should be more than one however, only one should be active, an inactive topology can be removed if required.
Search Permissions check
Permission checks
SharePoint Search Service account:
* Domain user account
* Must not be a member of the Farm Administrators group
* Read access to config, admin content, search & crawl databases
SharePoint crawl account (default content access account)
* Domain user account
* Must not be a member of the Farm Administrators group (to avoid crawling unpublished versions of documents)
* Read access to content sources being crawled
* Web Application(s) (done automatically)
* Member of the farm administrators group
Content Sources
By default when a search service application is created, one content source is also created which is usually called ‘Local SharePoint Sites’ within this, it should contain two urls, the intranet site and the mysites to which it’s set to crawl.
The current setup has the top level Central Admin address which crawls everything in one however, it might be wise to split this into two content sources to separate the crawls and therefore less strain at a certain time should a full crawl be required.
Types of Crawls
Since the release of SharePoint 2013, Microsoft released a new type of crawl that wasn’t available in previous SharePoint versions, which is the continuous crawl. In every SharePoint Online environment, this is set to continuous and cannot be changed as the back end is managed by Microsoft themselves. So in SharePoint 2013 we have three different crawls, the continuous crawl, incremental crawl & full crawl, below is the difference between them all.
Full Crawl
Crawls all content under content source.
When to do a full crawl
* SharePoint Service Packs/Cumulative Updates
* Software Updates
* Crawl rules added, modified or deleted
* Changes to managed metadata
* If there hasn’t been any full crawl of the site
* If a crawl has been stopped, the next crawl will be a full crawl
* ASPX page changes
* Database changes
Incremental Crawl
Crawls content which has been added or modified after the last successful crawl, index only updates when the crawl is completed.
For an incremental crawl, once started you’re not able to launch a second crawl in parallel on the same content source, changes that occur during this crawl will need to wait until the next crawl has run in order to populate the index. The schedule for the incremental crawl will determine how long someone will have to wait for their updates.
Continuous Crawl
Crawls content in 15 minute intervals, if the crawl hasn’t completed in this time then a second will kick off and so on. The index is basically updated continuously and won’t stop unless manually disabled.
For a continuous crawl, this runs at regular intervals. The major difference between the two crawls is a continuous crawl allows further crawls to run in parallel, so you wouldn’t have to wait an hour if you made a modification to a document during a crawl, it would be caught every 15minutes when a crawl is ran. When a continuous crawl is in progress, this cannot be paused or stopped, only disabled, to disable this we’ll need to edit the content source and choose ‘enable incremental crawls’.
Please do get in touch should you require assistance in Search Topologies for SharePoint 2013, 2016 or 2019