As I work with workflows I’ll be updating this post as I come across reasons as to why workflows fail to run.
1. Workflow History List Permissions
I’ve recently completed a lengthy approval workflow to which kept failing if an end user created the item, any user in the owners group worked correctly. The users had edit access on the list as well as the tasks list.
I noticed it kept failing at the start of the workflow as I have ‘log to history list’ to help understand where in the workflow I am in case of errors like this, as well as having statuses. I knew for sure users had full edit permissions on the two lists I created however, I didn’t think to check the Workflow History list permissions.
When having ‘log to history list’, users need to be able to edit that list in order for the workflow to log the item to the list which was my issue. I wasn’t using the default members group to group these users, I created my own groups which is why they never had access to that list, giving users access to that list made the approval work as expected.
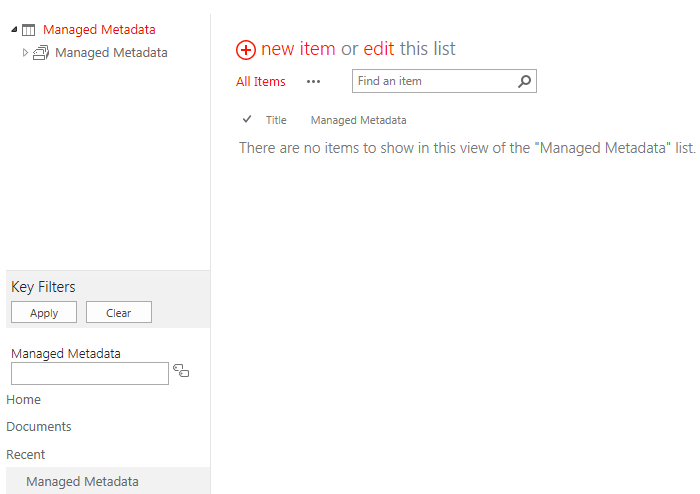
As the history list is hidden, the easiest way to find this is to type in your SharePoint URL and add /lists/workflow%20history to the end.
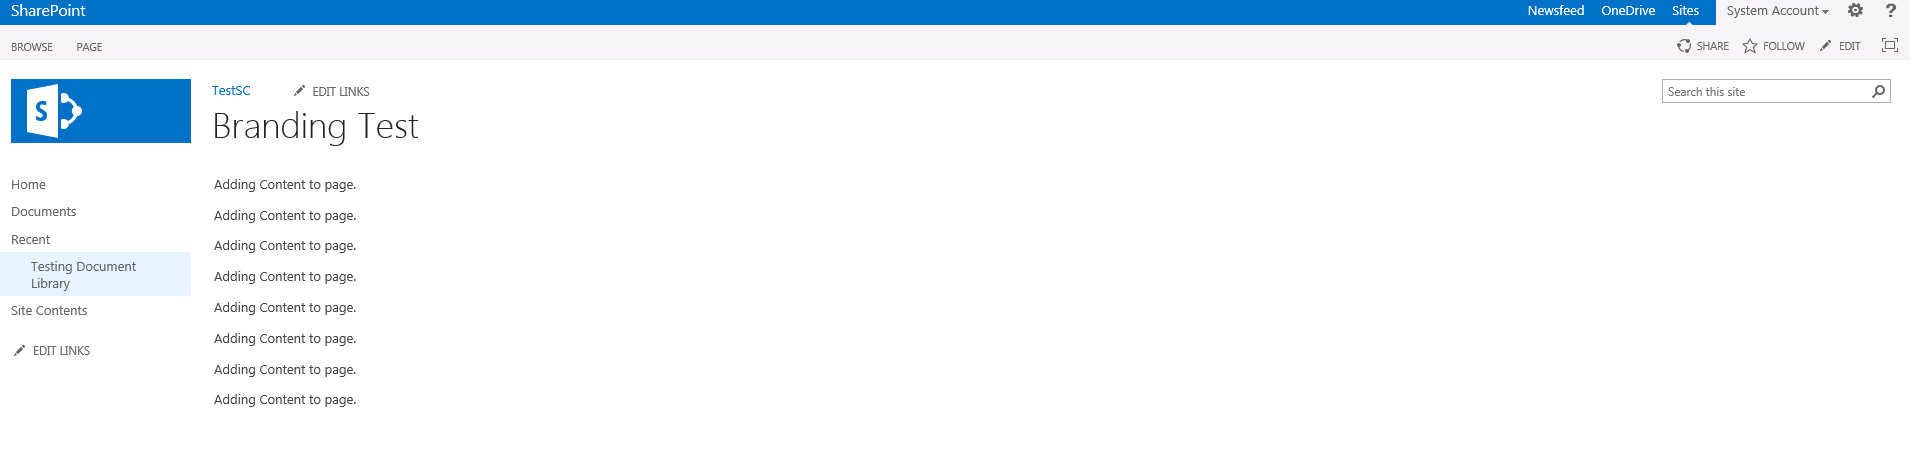
Over the past few months I’ve been asked whether it’s possible to hide columns based on the value of another column and whether it’s a fast and easy change, the answer is basically yes.
If you have a custom Display or Edit Form, you can manipulate the columns slightly to hide an irrelevant column. Take a look at the screenshots below of my SharePoint list and SharePoint Designer Form.
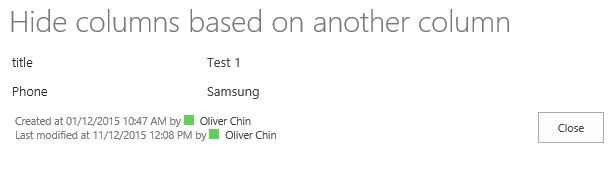
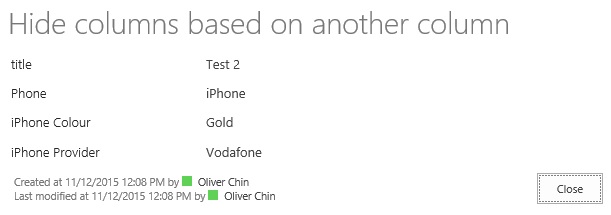
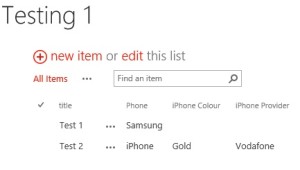
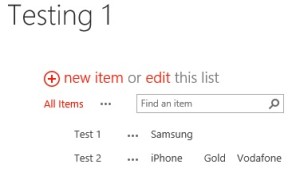
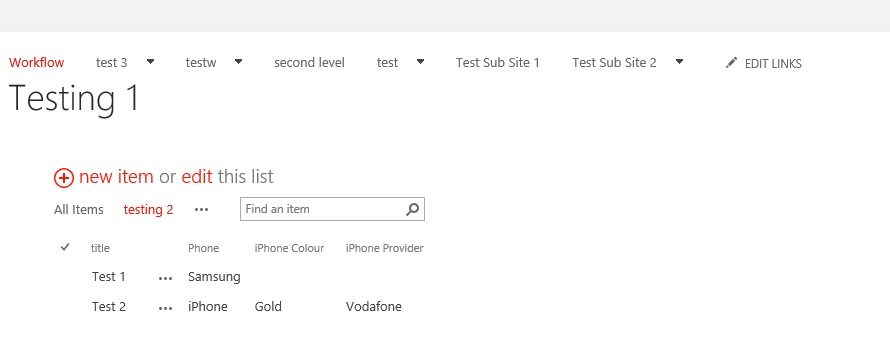
To begin with I have a list with just 4 columns. As you will notice two of the columns only relate to iPhone and therefore are useless if the phone is a Samsung.
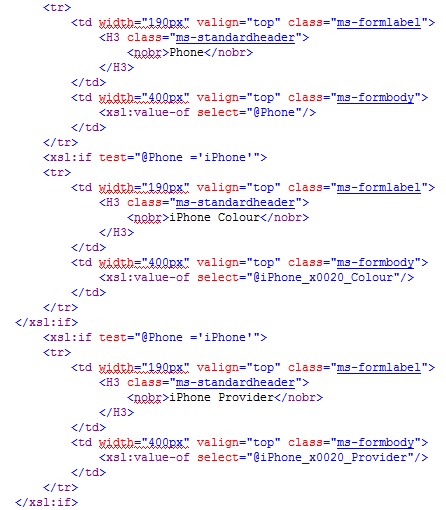
The way to hide the columns is through SharePoint Designer, edit the form in advanced mode and scroll down to your columns. The only modification that is required is to add <xsl:if test=”<COLUMN-NAME> = ‘COLUMN-RESULT'”> before the <tr> as well as after the </tr> as shown below. (code isn’t lined up, sorry about that!)
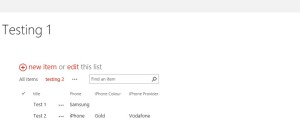
The end results when I click on each item from my list are below.
Unfortunately this isn’t possible on the New Form as this would require it to be dynamic to which mine isn’t.
An alternative way of doing this is to use to code here: https://github.com/kitmenke/sputility, copy the jquery & sputility to a SharePoint Library and reference as below. This is ideal as the form is dynamic and to me, easier to work with. Credit goes to kitmenke!
***edit the form from within SharePoint (edit page) & insert a script editor webpart to paste the below in***
In recent months I’ve created many approval workflows for many different scenarios. In this post I will provide a step by step guide of how to create a basic approval workflow.
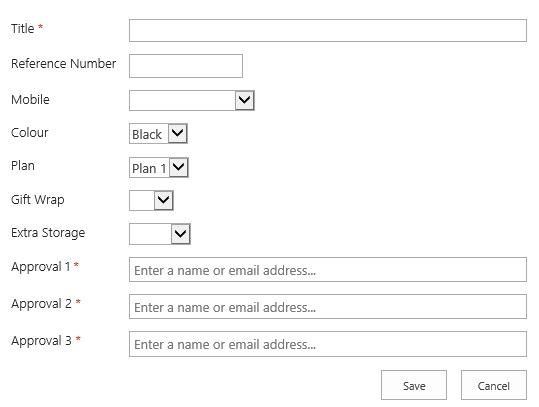
To start with I have a simple list, which has 3 approvers. Stage 1
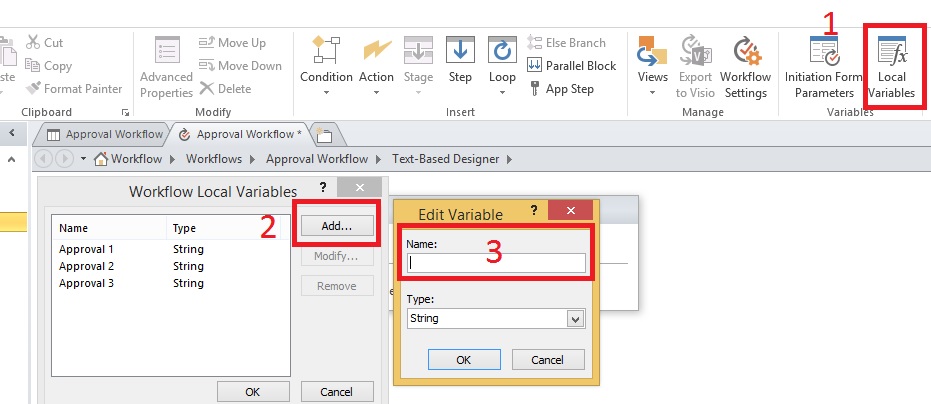
To start this workflow, open SharePoint designer, navigate to your list and create a new 2013 workflow. As per the screenshot below, in the ribbon select ‘local variables’, click add & input the name of the approver, I’ve done this three times due to three approvers (one for each approver).
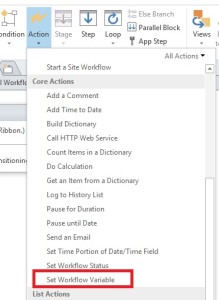
Within the first stage of your workflow, click Actions in the ribbon and select ‘Set Workflow Variable’.
Fill out the details as follows:
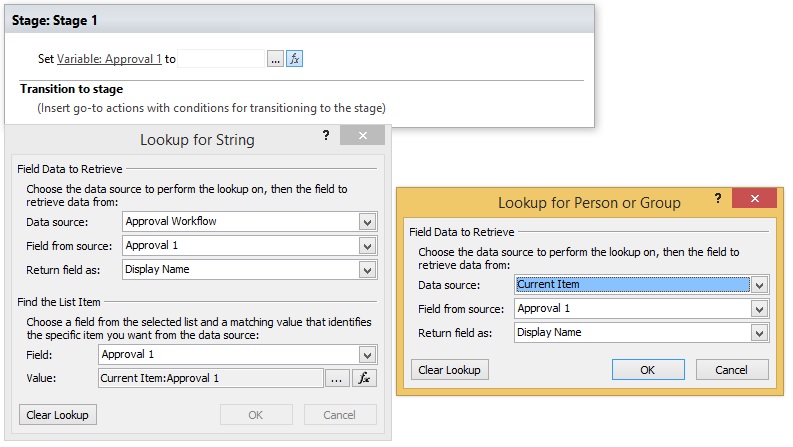
In the top section:
Data Source:
Select your list
Field from source:
Select the column in your list
Return field as:
Display Name
In the bottom section:
Field:
Select the column in your list (same as Field from source)
Value:
Press the fx and set the data source, field from source & return field as the above
Your variable should look something similar to the below.
When you click OK to close the ‘Lookup for String’ window, you will be greeted by the message below, just press Yes to this.
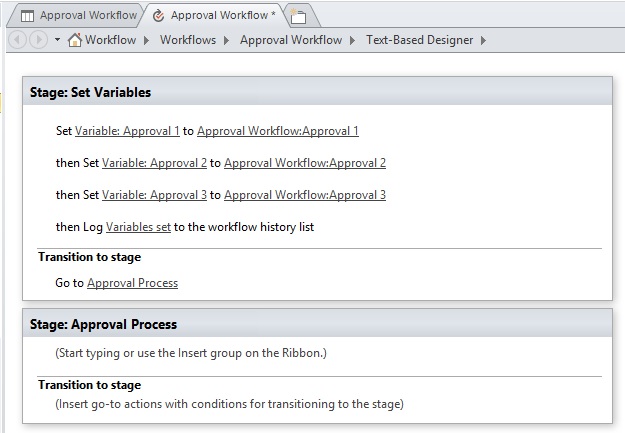
The last part for the first stage is to set the name of the stage, log to history list & then Transition to stage. To log what we’ve done to the history list, click ‘Action’ and select ‘Log to History List’. The reason this is done is for finding where in the workflow it gets to if any errors appear when ran. In order to transition to another stage, you will need to create another stage. This can be achieved by clicking the stage button in the ribbon (next to action).
If the above has been followed correctly, your workflow will look similar to the below.
Stage 2
I tend to keep the approval stage separate from everything else, which is the reason behind stages.
The first part of this stage is to create the task process.
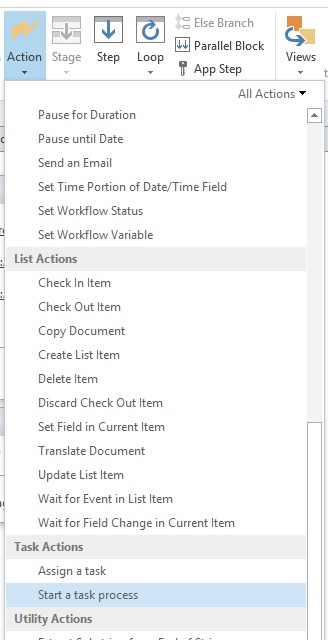
Select ‘Action’ in the ribbon, then ‘Start a task process’.
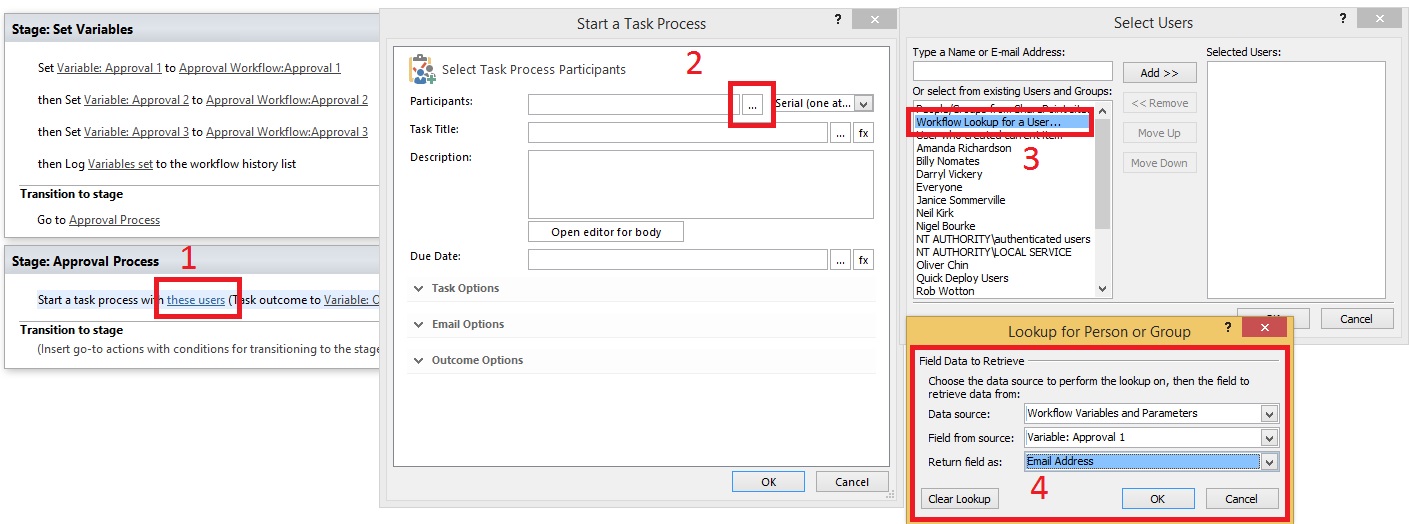
Click the ‘these users’ hyperlink for the window to open.
Click the ellipses for Participants.
Double click ‘Workflow Lookup for a User’
Data Source:
Workflow Variables and Parameters
Field from source:
Variable: Approval 1
Return field as:
Email Address
Repeat steps 4 & 5 for the Approval 2 & Approval 3 Variable.
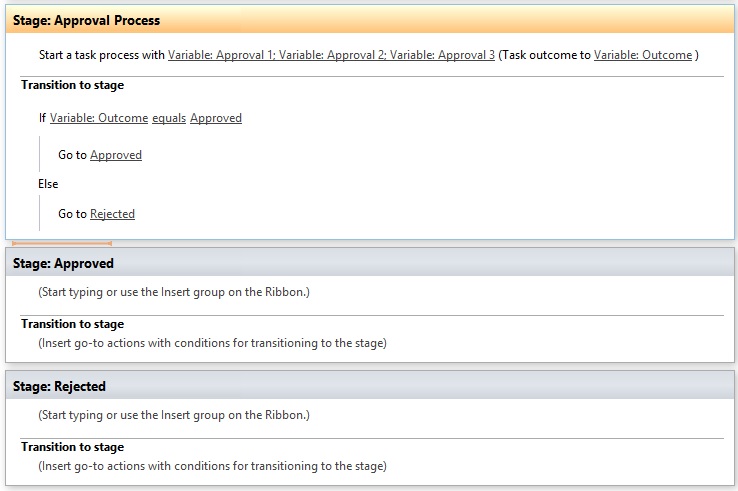
Once complete, click OK and close the task process windows. Now create two more stages, name these ‘Approved’ & ‘Rejected’. Within the approval process stage, right click the Transition to stage area and choose ‘If any value equals value’. Click the fx for the first value and put
Data Source:
Workflow Variables and Parameters
Field from source:
Variable: Outcome
Return field as:
***Blank***
Now click the second value and choose approved. Within the IF statement, right click and choose go to stage, choose Approved, below the Else, do the same and choose rejected.
The end result will look like the below.
Stage 3 & 4
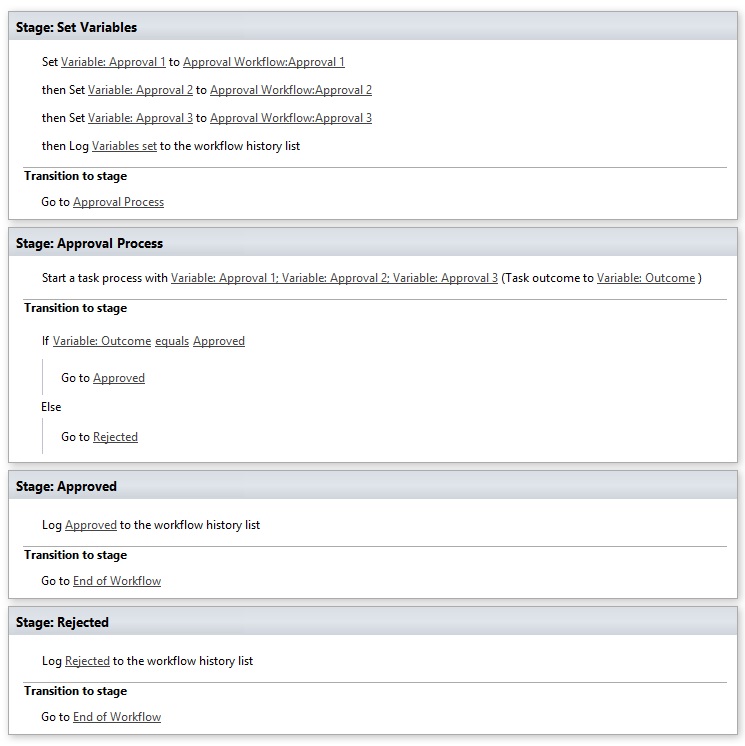
Stage 3 & 4 are similar to each other. The only real difference would be one is rejected and one is approved. Usually, once an item is approved or rejected, an email is sent out to the user who created the item to let them know it’s been approved however I shan’t go into detail on that. To finish the workflow, add an action of ‘Log to History List’ in both Approved & Rejected stages. On the Transition to stage, right click and choose go to stage, click the drop down and choose End of Workflow, this is for both the stages.
The end result is below. If you’d like to keep the user updated as to where in the approval this is, it may be ideal to use the ‘Set Workflow Status’ within the Actions in the ribbon. Alternatively, the workflow uses the Stage name for a status.
Within SharePoint there is a small button in the top right which focuses on the content. Basically it hides the top navigation and quick launch.
For my own purposes I required this to be the default as I was creating a display page. The following code below helped achieve this, it’s also worth noting that the Focus button can still be pressed if the user would like to view the navigation/quick launch.
The code below is not my own, this was through Technet forum replies.
When working with workflows I’ve realised that it’s best for my list URLs to have no spaces and therefore began to look for a useful solution rather than deleting the list and recreating. Fortunately, this can be done in SharePoint Designer.
Within SharePoint Designer, navigate to ‘All Files’, then Lists. If it’s a library, these should be in the ‘All Files’ folder.
Right click your list and choose ‘Rename’. This renames the list as well as the URL. The same happens for Libraries.
Please note – the edits I’ve done were against the .html page, if you do yours against the .master page, it will look slightly different to this however, the code that needs to be changed still applies.
If you’ve Googled Cascading Dropdowns you will realise there are various ways of doing this. Due to my background not being a developer of any sort the easiest solution to me was some short code. I’ve explained below the steps for creating this.
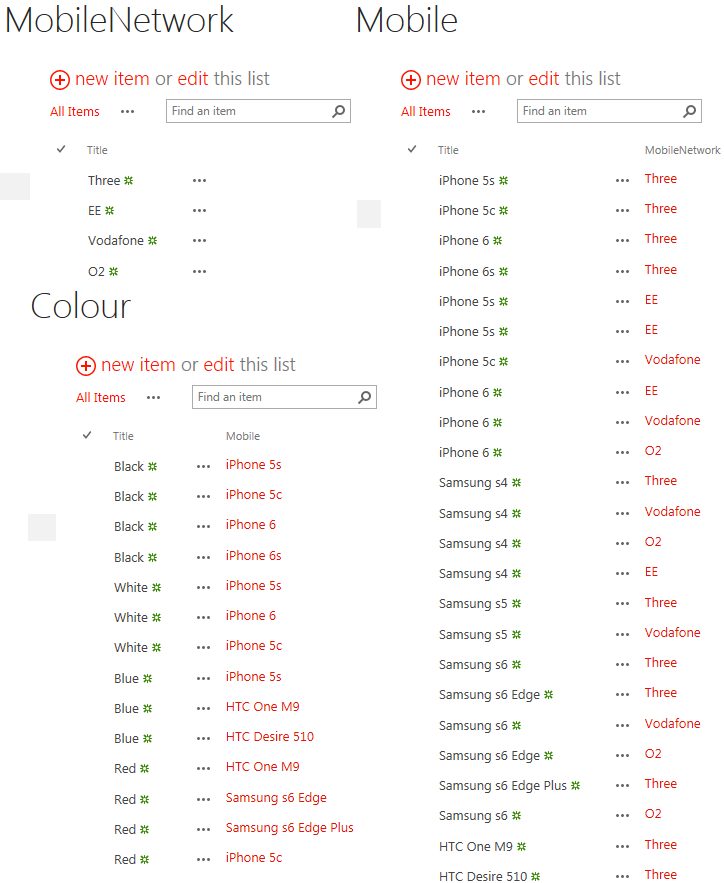
Create 3 lists (or more depending on how many cascading levels you require), you don’t need to rename the title column, we can use as is.
Create your master list that has all these drop downs in.
Using the three lists, populate your data, I’ve used mobile networks and their offerings.
Within each list, use a lookup to the previous list and insert the data as required, review the screenshot above for example.
Using your master list, add look-ups to all three different columns and order as required.
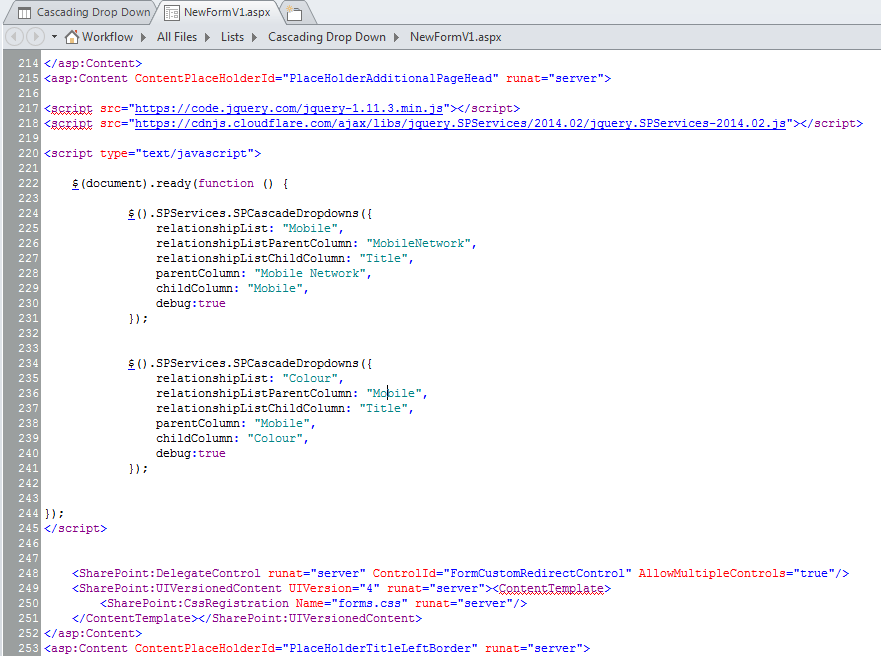
Open SharePoint Designer and navigate to your list, create a new ‘NewItem’ form & a new ‘EditForm’.
Edit the forms in advanced mode and search for ‘PlaceHolderAdditionalPageHead’.
In this section is where you will paste the following code.
___________________________________________________________________________________________________
<script src=”https://code.jquery.com/jquery-1.11.3.min.js”></script>
<script src=”https://cdnjs.cloudflare.com/ajax/libs/jquery.SPServices/2014.02/jquery.SPServices-2014.02.js”></script><script type=”text/javascript”>
Modify the code slightly to reference your own lists & columns within the lists, save and close. If this was done on the New Item form, do the exact same for the edit form.
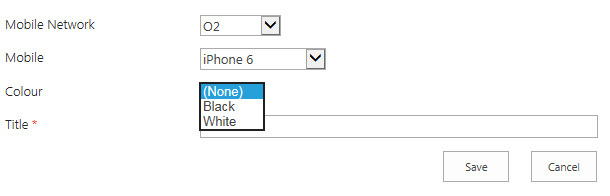
Open the list in SharePoint and viola!
There are a few different ways of doing this that doesn’t require modification of the forms however, for my own benefits I chose the forms to add this code to.
There could be a number of reasons as to why this may be useful, my reason being is the quick launch navigation as it is, is rather packed and therefore trying to use this functionality requires a lot of scrolling down every time. Fortunately you can place some script on the page to push the Metadata navigation to the top of the quick launch, code courtesy of Steve Borgwordt.
Within your list, edit the page and insert a Script editor webpart (Found in Media and Content under the Categories section). Add the following code below.
If you are unable to view the Metadata navigation settings, check the site features to confirm the ‘Metadata Navigation and Filtering’ feature is activated.
Recently I had an issue where a site owner could not access the Site Permissions, List or Library permissions. This was due to an Owner of the site collection removing the permissions for everyone accidentally and then a site collection admin adding them back in. The downside to this is that the owners group is no longer associated to the Access Requests List. The Access Request setting can be turned on or off, the option for Access Request Settings is then in the ribbon under Site Settings – Site Permissions. The resolution to this is to follow the Microsoft KB article here however, the alternate fix would be to just turn access requests off, although this wouldn’t be everyone’s ideal solution.
The Microsoft KB article is also below should the link ever change.
SOLUTION
To resolve this issue, users must be either site collection administrators or be members of the Owners group for the site. The Owners group must also have permissions to access the Access Requests list. Use the following solutions as appropriate for your specific configuration.
Site collection administrator
If an affected user should be a site collection administrator, go to the following Microsoft website for more information about how to manage administrators for your sites:
If the user should be a site owner, you must add the user to the Owners group for the site. To do this, follow these steps:
As a user who can change site permissions, browse to the affected site or site collection. Click the gear icon for the Settings menu, and then click Site settings.
Click Site permissions.
Click the Owners group for the site.
Click New.
In the Share dialog box, enter the user account of the user who you want to add to the group. Then, click Share.
Test to verify that the user can now access the list and approve or decline requests.
Make sure that the Owners group has permissions to the Access Requests list
If the Owners group is changed or was removed from the Access requests list, you must add the Owners group permissions for the list. You must also make sure that the affected user is included in the Owners list. To do this, follow these steps:
As a user who has the Manage Permissions Permission Level on the affected site and who also has access to the Access Requests list (for example, a Site Collection administrator), browse to the Access Requests list in Internet Explorer.
Press F12 to open the F12 Developer Tools window.
Click the Network tab, and then press F5 to enable network traffic capturing.
Refresh the Access Requests page in Internet Explorer. After the page has loaded, press Shift+F5 to stop capturing network traffic.
In the Developer Tools window, double-click the first result in the URL list. This URL ends in “pendingreq.aspx.”
In the Developer Tools window, click Request body.
In the search box, type pagelistid:, and then press Enter.Note The search highlights the pageListId text.
Copy the GUID that follows the pageListId. The GUID will be between an opening brace ( { ) character and a closing brace ( } ) character as follows:
{GUID}
Note Include the opening and closing brace characters when you copy the GUID. This GUID is the identifier for the SharePoint Online Access Requests list for your organization.
In the browser address bar, enter https://<URL<URL of affected site or site collection>/_layouts/15/ListEdit.aspx?List=<{GUID}>, and then press Enter.Note In this address, <URL of affected site or site collection> represents the URL for the site collection in which you want to change the access requests (for example, https://contoso.sharepoint.com). And <{GUID}> represents the GUID that you copied in step 8.
On the Settings page, click Permissions for this list.
Make sure that the Owners group for the site is included in the list of permissions for the Access Requests list. If the Owners group for the site collection does not exist, click Grant Permissions, enter the name of the Owners group for the site in the Share dialog box, and then click Share.
Follow the steps in the “Add the user to the Owners group for the site” section to make sure that the user is included in the Owners group.